做文学网站需要/俄罗斯网络攻击数量增长了80%
目录
一、Antd
1.1、基本使用
1.2、自定义主题
二、Redux
2.1、工作流程
2.2、理解react-redux
2.3、优化
2.3.1、简写mapDispatch
2.3.2、Provider组件
2.4、数据共享
2.4.1、编写Person组件
2.4.2、Person组件的reducer
2.4.3、完成数据共享
2.5、求和案例
2.5.1、完整版
2.5.2、异步版
2.6、纯函数
2.7、开发者工具
2.8、求和案例(最终版)
2.9、useSelector 和 useDispatch
三、比较redux、vuex、pinia
3.1、共同点
3.2、不同点
3.2.1、状态变更方式
3.2.2、模块化管理
四、扩展
4.1、setState
4.2、lazyLoad
4.3、Hooks
4.3.1、StateHook--useState
4.3.2、EffectHook--useEffect
4.3.3、RefHook--useRef
4.4、Fragment
4.5、Context
4.6、组件优化(PureComponent)
4.7、renderProps
4.8、错误边界(ErrorBoundary)
一、Antd
1.1、基本使用
官网:组件总览 - Ant Design 【下载:npm i antd】,建议按需引入。
1.2、自定义主题
在 create-react-app 中使用 - Ant Design这个文档3.XX版本写的比较详细。
const { override, fixBabelImports } = require("customize-cra");
const { override, fixBabelImports, addLessLoader } = require("customize-cra");
module.exports = override(fixBabelImports("import", {libraryName: "antd",libraryDirectory: "es",style: "css",style: true,}),addLessLoader({javascriptEnabled: true,modifyVars: { "@primary-color": "#1DA57A" },})
);
二、Redux
中文官网:Redux 中文文档 【下载:npm i redux】
redux是一个专门用于做状态管理的JS库,集中式管理react多个组件共享的状态。
2.1、工作流程
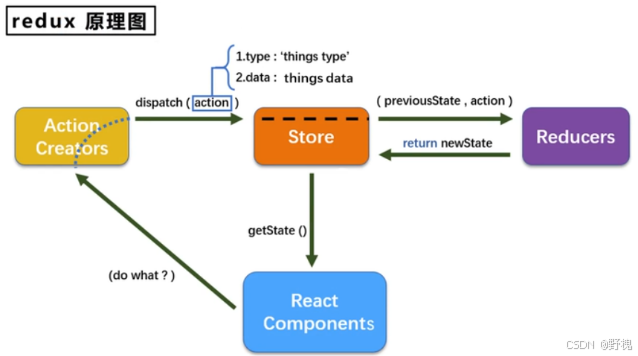
总结:
action里都是(dispatch)触发事件的类型
reducers里就是纯函数:用来将获取到的数据进行具体的处理
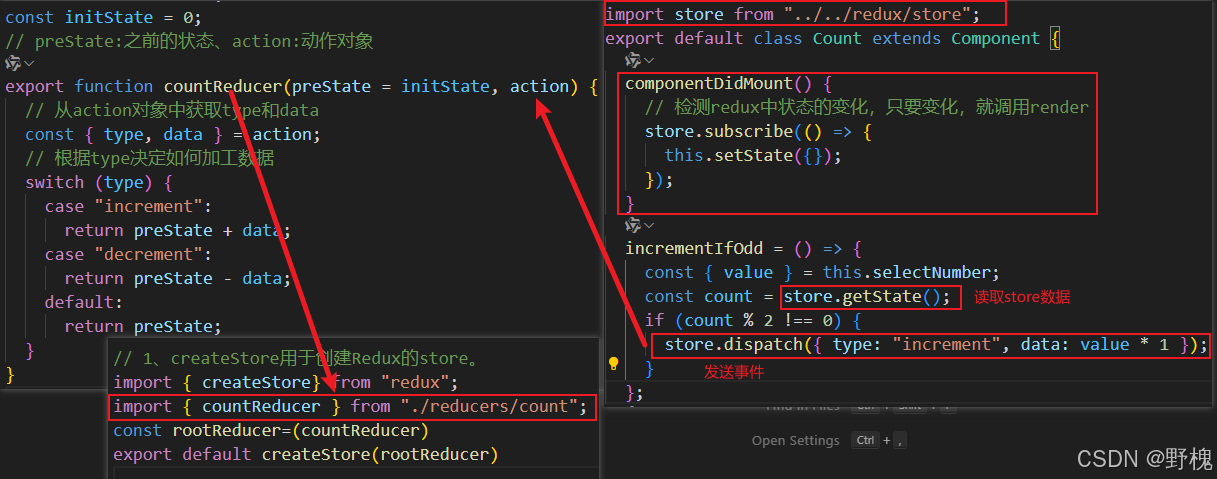
精简版求和案例
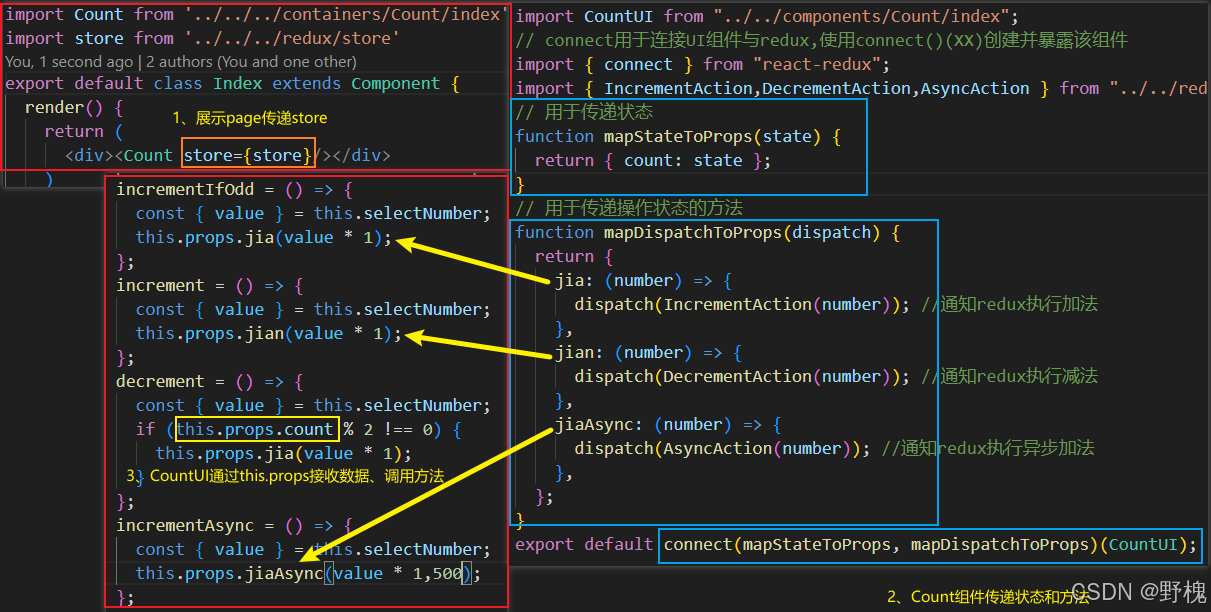
2.2、理解react-redux
下载:npm i react-redux

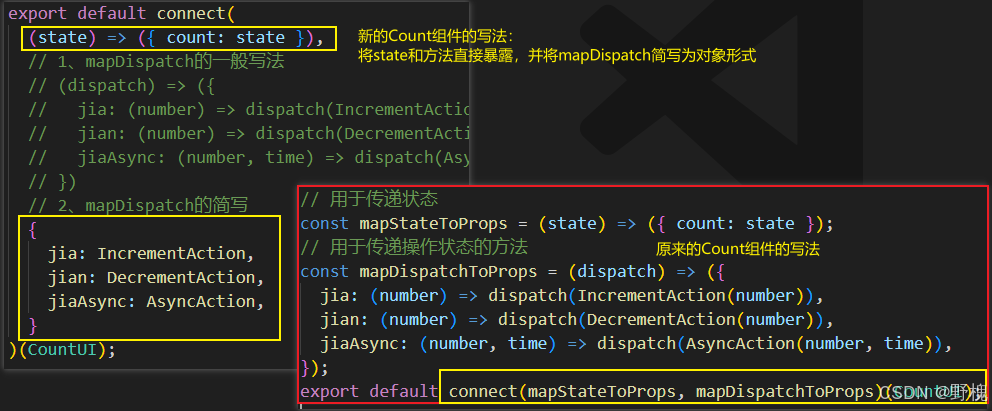
2.3、优化
2.3.1、简写mapDispatch
2.3.2、Provider组件
import store from './redux/store';
import { Provider } from 'react-redux';
const root = document.getElementById('root')
ReactDOM.render(// 用Provider包裹App,目的是把store传给App的所有后代<Provider store={store}><App /></Provider>,root
);
总结:
1、将Redux的store传递给其所有子组件。不需要<Count store={store}/>单个传递;
2、确保所有组件都能访问到同一个Redux store,保证状态的一致性;
3、不需要手动将store传递给每个组件,简化了状态管理的复杂性。
2.4、数据共享
2.4.1、编写Person组件
import React, { Component } from 'react'
import {nanoid} from 'nanoid'
import {connect} from 'react-redux'
import {addPerson} from "../../redux/actions/person"
class Person extends Component {addPerson=()=>{const name=this.nameNode.valueconst age=this.ageNode.value*1const personObj={id:nanoid(),name,age}this.props.addPerson(personObj)this.nameNode.value=''this.ageNode.value=''}render() {return (<div><h1>上方组件求和为:{this.props.count}</h1><input ref={c=>this.nameNode=c} type="text" placeholder='输入名字'/><input ref={c=>this.ageNode=c} type="text" placeholder='输入年龄'/><button onClick={this.addPerson}>添加</button><ul>{this.props.personArr.map((item)=>{return <li key={item.id}>{item.name}--{item.age}</li>})}</ul></div>)}
}
export default connect(state=>({personArr:state.persons,count: state.count}),{addPerson}
)(Person)
2.4.2、Person组件的reducer
先定义actions,再写reducer
import { ADD_PERSON } from "../types/constant";
export const addPerson = person => ({type: ADD_PERSON,data: person})
import { ADD_PERSON } from "../types/constant";
const initState = [{ name: '张三', age: 18, id: 1 }]
export default function personReducer(preState = initState, action) {const { type, data } = actionswitch (type) {case ADD_PERSON:// preState.unshift(data) 此处不可以这样写return [data, ...preState]default:return preState}
}2.4.3、完成数据共享
在reducer文件夹里集合所有分散的文件.js
import { combineReducers } from "redux";
import count from "./count";
import persons from "./person";
export default combineReducers({count,persons,
});
统一在store里引入
// 1、createStore用于创建Redux的store。
import { createStore, applyMiddleware} from "redux";
import allReducer from "./reducers/index";
// 引入中间件,支持异步action
import thunk from "redux-thunk";
// 引入redux开发者工具
import { composeWithDevTools } from "redux-devtools-extension";
export default createStore(allReducer,composeWithDevTools(applyMiddleware(thunk))
);
2.5、求和案例
2.5.1、完整版
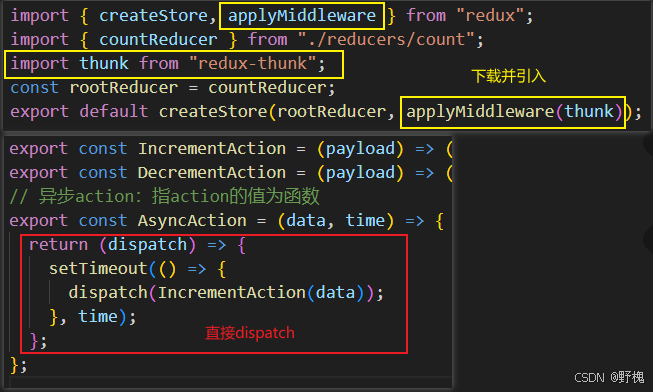
2.5.2、异步版
下载:npm i redux-thunk
redux-thunk是一个Redux中间件,在Redux的action creators中编写异步逻辑(比如网络请求、定时器等)
2.6、纯函数
1、一类特别的函数:只要是同样的输入(实参),必定得到同样的输出(返回);
2、必须遵守以下约束:
(1)、不得改写参数数据;
(2)、不会产生任何副作用,例如网络请求、输入输出设备;
(3)、不能调用Date.now()或者Math.random()等不纯的方法。
3、redux的reducer函数必须是一个纯函数(参照下方的函数)
export default function personReducer(preState = initState, action) {const { type, data } = actionswitch (type) {case ADD_PERSON:// preState.unshift(data) 此处不可以这样写,会让preState被修改,导致personReducer不是一个纯函数return [data, ...preState]default:return preState}
}
2.7、开发者工具
在浏览器的扩展程序中搜索:Redux DevTools
并在项目里安装npm i redux-devtools-extension,并在store.js里引入,项目右上角图标点亮后,在控制台这一行的redux里可以看到每个事件的触发和数据的变化
// 引入redux开发者工具
import { composeWithDevTools } from "redux-devtools-extension";
export default createStore(allReducer,composeWithDevTools(applyMiddleware(thunk))
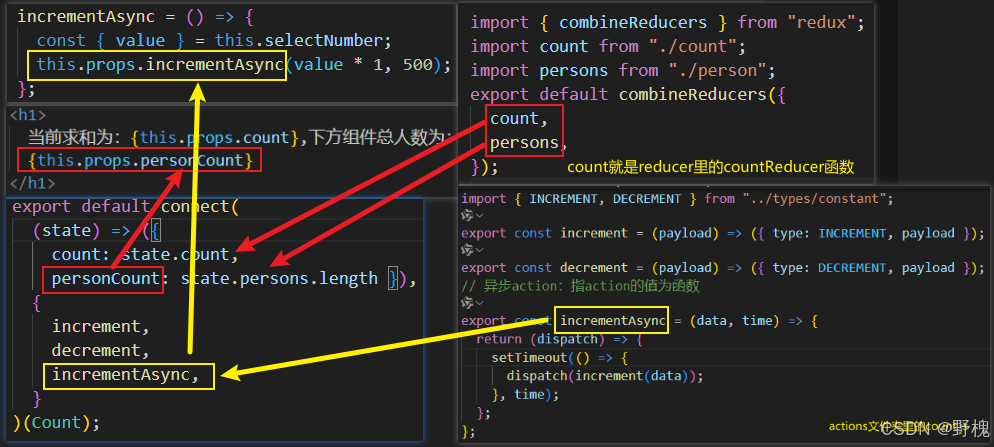
);2.8、求和案例(最终版)
import React, { Component } from "react";
import { connect } from "react-redux";
import {increment,decrement,incrementAsync,
} from "../../redux/actions/count";
class Count extends Component {incrementIfOdd = () => {const { value } = this.selectNumber;if (this.props.count % 2 !== 0) {this.props.increment(value * 1);}};increment = () => {const { value } = this.selectNumber;this.props.increment(value * 1);};decrement = () => {const { value } = this.selectNumber;this.props.decrement(value * 1);};incrementAsync = () => {const { value } = this.selectNumber;this.props.incrementAsync(value * 1, 500);};render() {return (<div><h1>当前求和为:{this.props.count},下方组件总人数为:{this.props.personCount}</h1><select ref={(c) => (this.selectNumber = c)}><option value="1">1</option><option value="2">2</option><option value="3">3</option></select> <button onClick={this.increment}>加</button> <button onClick={this.decrement}>减</button> <button onClick={this.incrementIfOdd}>当前求和为奇数再加</button> <button onClick={this.incrementAsync}>异步加</button></div>);}
}
export default connect((state) => ({ count: state.count, personCount: state.persons.length }),{increment,decrement,incrementAsync,}
)(Count);
分析这个页面的数据来源:
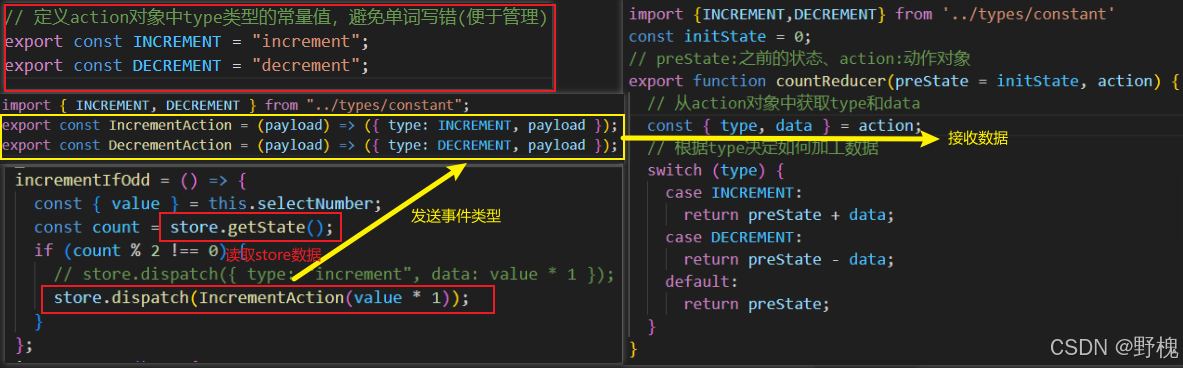
1、type文件夹里的constant.js
// 定义action对象中type类型的常量值,避免单词写错(便于管理)
export const INCREMENT = "increment";
export const DECREMENT = "decrement";
export const ADD_PERSON = "add_person";
2、reduces文件夹里依旧是count.js
import {INCREMENT,DECREMENT} from '../types/constant'
const initState = 0;
// preState:之前的状态、action:动作对象
export function countReducer(preState = initState, action) {// 从action对象中获取type和dataconst { type, data } = action;// 根据type决定如何加工数据switch (type) {case INCREMENT:return preState + data;case DECREMENT:return preState - data;default:return preState;}
}
3、将reducers文件夹里的count.js、person.js都合并到index.js,再在store.js里面引入,在Count组件的connect里引入数据和方法,在页面通过this.props.xxx进行使用
2.9、useSelector 和 useDispatch
有时候也会见到下面这样的写法,和上面原理是一样的
import React from 'react';
import { useSelector, useDispatch } from 'react-redux';
const MyComponent = () => {const count = useSelector(state => state.counter); // 从 Redux 状态中选择数据const dispatch = useDispatch();const increment = () => {dispatch({ type: 'INCREMENT' }); // 分发 Redux 动作};return (<div><p>Count: {count}</p><button onClick={increment}>Increment</button></div>);
};
export default MyComponent;
三、比较redux、vuex、pinia
3.1、共同点
1、全局状态管理
都提供了全局状态管理的功能,在整个应用中共享和管理状态。
2、单向数据流
都遵循单向数据流的原则,即状态的更新是通过特定的流程进行的。3、性能稳定,都支持ts
3.2、不同点
3.2.1、状态变更方式
1、Redux
通过 Reducer 函数处理 Actions 来更新状态。
特点:状态更新必须通过纯函数(Reducer)完成,确保状态的不可变性;异步操作通过中间件(如 Thunk 或 Saga)实现,允许在 Action 中执行异步逻辑。
2、Vuex
必须通过 Mutations 来更新状态。
特点:状态更新必须是同步的,通过this.$store.commit 派发 Mutations;异步操作需要通过 this.$store.dispatch 派发 Actions,Actions 再触发 Mutations。
3、Pinia
同步异步操作都直接在 Actions 中修改状态,无需 Mutations。
特点:简化了状态更新流程,减少了样板代码。
3.2.2、模块化管理
1、Redux
通过 Reducer 的组合来实现模块化。
特点:支持复杂的状态结构,但需要手动管理模块。
2、Vuex
通过 Modules 来分割状态管理。
特点:支持模块化,但需要手动配置模块的注册和取消注册。
3、Pinia
每个Store是独立的,无需手动配置模块。
特点:模块化更灵活,避免了复杂的嵌套结构
四、扩展
4.1、setState
class Index extends Component {state = { count: 0 };add = () => {// 1、对象式setStateconst { count } = this.state;this.setState({ count: count + 1 }, () => {console.log("更新后", this.state.count);//输出1});console.log("此时值还未更新", this.state.count);//输出0// 2、函数式setStatethis.setState(state=>({count:state.count+1}))};render() {return (<div><h1>当前求和为:{this.state.count}</h1><button onClick={this.add}>点我+1</button></div>);}
}
总结:
1、setState是异步操作,有对象式和函数式两种写法,对象式是函数式的语法糖;
2、使用原则:
(1)、如果新状态不依赖于原状态===>使用对象方式;
(1)、如果新状态依赖于原状态===>使用函数方式;
(1)、如果需要获取执行后最新的状态数据,在第二个callback函数中读取。
4.2、lazyLoad
React 提供了 React.lazy 和 Suspense 来实现组件的懒加载。React.lazy 用于动态导入组件,而 Suspense 用于包装懒加载组件,提供加载状态。
import React, { Suspense, lazy } from 'react';
import { BrowserRouter as Router, Routes, Route, Link } from 'react-router-dom';
// 动态加载路由组件
const Home = lazy(() => import('./pages/Home'));
const About = lazy(() => import('./pages/About'));
function AppRouter() {return (<Router><nav><ul><li><Link to="/">Home</Link></li><li><Link to="/about">About</Link></li></ul></nav>{/* 使用 Suspense 包裹路由 */}<Suspense fallback={<div>Loading...</div>}><Routes><Route path="/" element={<Home />} /><Route path="/about" element={<About />} /></Routes></Suspense></Router>);
}
export default AppRouter;
// src/router/routes.js 高级配置
import { lazy } from 'react';
const routes = [{path: '/',component: lazy(() => import('../pages/Home')),},{path: '/about',component: lazy(() => import('../pages/About')),}
];
export default routes;4.3、Hooks
4.3.1、StateHook--useState
import React, { useState } from "react";
export default function Index() {// setXXX:更新状态的函数,状态更新是异步的const [count, setCount] = useState(0);const [name, setName] = useState("tom");function add() {setCount(count + 1); //第一种写法}function changeName() {setName("jerry");}return (<div><h1>当前求和为:{count}</h1><button onClick={add}>点我+1</button>{/*第二种写法 */}<button onClick={() => setCount(count - 1)}>点我-1</button><h1>当前求和为:{name}</h1><button onClick={changeName}>改名</button></div>);
}
参数:第一次初始化指定的值在内部作缓存
返回值:第一个为内部当前状态值,第2个为更新状态值的函数
4.3.2、EffectHook--useEffect
useEffect(() => {let timer = setInterval(() => {setCount((count) => count + 1);}, 1000);return () => {clearInterval(timer);};},[]);可以将它看作componentDidMount、componentDidupdate、componentWillUnmount三个函数的组合。
4.3.3、RefHook--useRef
const inputRef = useRef(null);function getInputValue() {inputRef.current.focus();alert(inputRef.current.value);}return (<div><input type="text" ref={inputRef} /></div>);总结:
useState:用于在函数组件中添加状态。
useEffect:用于处理副作用,例如数据获取、订阅或手动更改 DOM。
useRef:用于创建可变引用,访问DOM元素,存储任何值,而不会触发组件重新渲染
4.4、Fragment
使用简写语法 <></>
<Fragment><p>First paragraph</p><p>Second paragraph</p>
</Fragment>
<>{items.map((item, index) => (<p key={index}>{item}</p>))}
</>用途:
1、返回多个元素
2、动态生成多个元素
3、避免多余的包装元素,保持结构清晰
4.5、Context
Context在组件树中传递数据,不需要通过逐层传递props。它特别适用于全局状态管理。Provider:提供上下文值,用于包裹组件树。
Consumer:消费上下文值,用于从上下文中获取值。
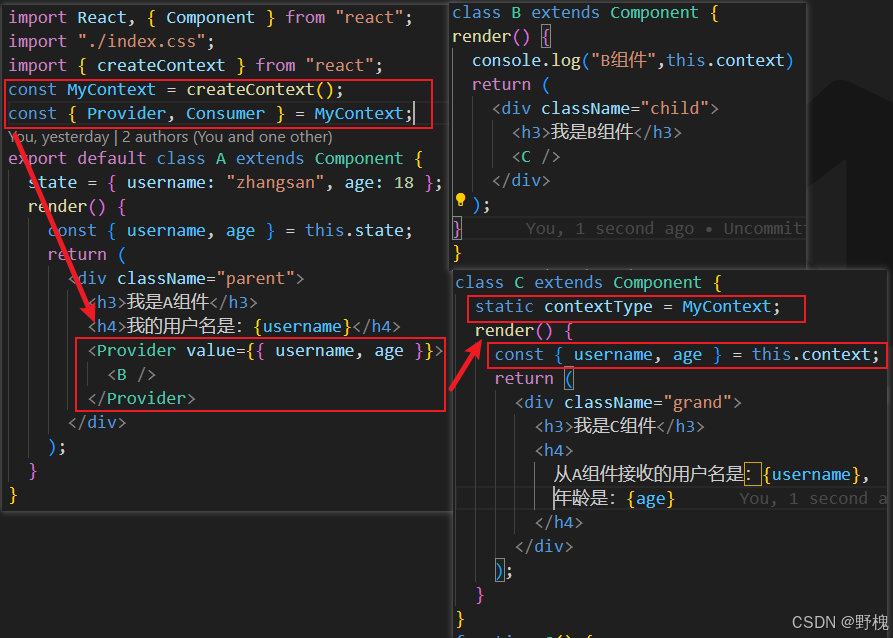
function C() {return (// const context = useContext(MyContext);<div className="grand"><h3>我是C组件</h3><h4>从A组件接收的用户名是:<Consumer>{(value) => `${value.username},年龄是:${value.age}`}</Consumer></h4></div>);
}
1、Provider 的作用域:
Provider 提供的上下文值只能在其子组件中访问。如果 C 组件也需要访问这些值,同样需要使用 Consumer 或 useContext。
2、类组件和函数组件的区别:
类组件需要使用 Consumer 来访问上下文值。
函数组件可以直接使用 useContext Hook。
4.6、组件优化(PureComponent)
场景:当子组件接收父组件的数据,父组件触发setState时,子组件也会改变,这样效率低
import React, { PureComponent } from "react";
import "./index.css";
export default class A extends PureComponent {state = { carName: "奔驰" };changeCar = () => {// this.setState({ carName: "宝马" });this.setState({});//这种情况下就不会再次触发render了// const obj=this.state// obj.carName="宝马"// console.log(obj===this.state);// this.setState(obj)};// shouldComponentUpdate(nextProps, nextState) {//   return !this.state.carName === nextState.carName;// }render() {console.log("A组件渲染了");const { carName } = this.state;return (<div className="parent"><h3>我是parent组件</h3><h4>我的用户名是:{carName}</h4><button onClick={this.changeCar}>点我换车</button><B carName={carName} /></div>);}
}
class B extends PureComponent {render() {console.log("B组件渲染了");return <div className="child">接到的车:{this.props.carName}</div>;}
}
低效率原因:
组件中的shouldComponentUpdate()总是返回true
高效率做法:
只有当组建的state或props数据发生改变时才重新render()
解决:
1、比较新旧数据,有变化再返回true,否则返回false
2、将Component改为PureComponent
注意:只是进行state和props数据的浅比较,如果只是数据对象内部变了,返回false,不要直接修改state数据,而是要产生 新数据
4.7、renderProps
import React, { Component } from "react";
import "./index.css";
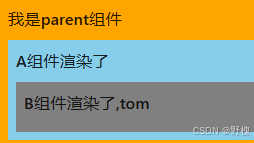
export default class Parent extends Component {render() {return (<div className="parent"><h3>我是parent组件</h3><A render={(name) => <B name={name} />} /></div>);}
}
class A extends Component {state = { name: "tom" };render() {console.log("A组件渲染了", this.props);const { name } = this.state;return (<div className="a"><h3>A组件渲染了</h3>{this.props.render(name)}</div>);}
}
class B extends Component {render() {console.log("B组件渲染了");return (<div className="b"><h3>B组件渲染了,{this.props.name}</h3></div>);}
}
如何向组件内部动态传入带内容的结构(标签)?
vue中:
使用slot技术,也就是通过组件标签体传入结构 <A><B/></A>
React中:
使用children props:通过组件标签体传入结构
使用render props:通过组件标签属性传入结构,一般用render函数属性
4.8、错误边界(ErrorBoundary)
import React from 'react';
class ErrorBoundary extends React.Component {constructor(props) {super(props);this.state = { hasError: false };}static getDerivedStateFromError(error) {// 更新 state 以便下次渲染显示降级 UIreturn { hasError: true };}componentDidCatch(error, errorInfo) {// 你同样可以将错误日志记录到一个错误报告服务console.log(error, errorInfo);}render() {if (this.state.hasError) {// 渲染一个降级 UIreturn <h1>Something went wrong.</h1>;}return this.props.children; }
}
class MyComponent extends React.Component {render() {return (<div><button onClick={() => { throw new Error('Test'); }}>Click me</button></div>);}
}
function App() {return (<ErrorBoundary><MyComponent /></ErrorBoundary>);
}
它能够捕获其子组件树中发生的 JavaScript 错误,并能够显示一个后备 UI(而不是整个应用崩溃)。错误边界无法捕获以下错误:
(1)、它自身渲染过程中的错误;
(2)、生命周期方法中的错误(如
componentDidMount、componentDidUpdate等);(3)、构造函数中的错误;
(4)、
componentDidCatch中的错误;(5)、在
try块之外进行的异步代码中的错误(因为这些错误不会传播到React的事件系统)。